 After several months of development, the official Nginx version of the 7G Firewall is out of beta and ready for public use. If you are not familiar with 7G Firewall, check out the documentation for the Apache/.htaccess version. The Nginx version of the 7G Firewall works the exact same way, so I won’t bother repeating everything here. The only difference is the implementation, how to set it up on an Nginx server, which is explained in this post.
Contents
Preamble
In order to implement the Nginx version of 7G Firewall, you need to be familiar with Nginx and its various configuration files. That is to say, this is not a tutorial on setting up or configuring Nginx in general. Rather it assumes that you already have Nginx up and running, and want to add the 7G Firewall.
Overview
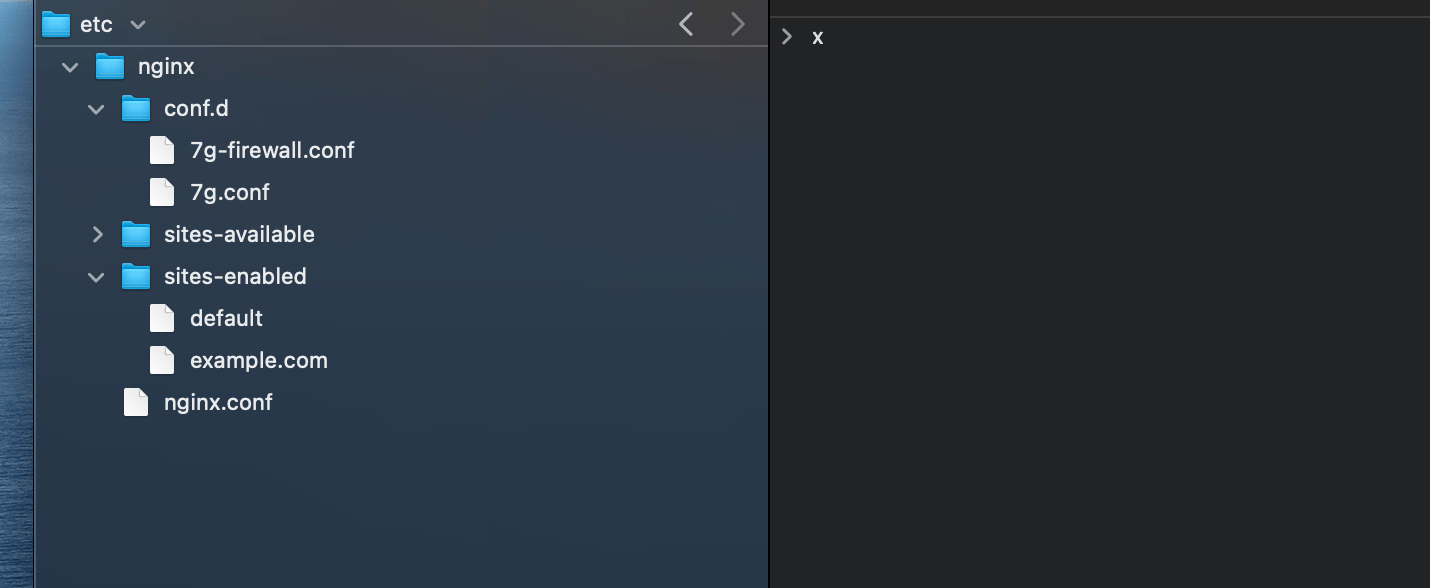
There are two parts to Nginx 7G: conditional logic and firewall rules. Each of these parts will be placed in their own file. Then each file needs included via your Nginx configuration. Here is a visual of the basic directory structure:
The main Nginx configuration file is /nginx/nginx.conf. This file will include 7g-firewall.conf, which contains the actual 7G Firewall rules.
The local/site configuration file is /nginx/sites-enabled/example.com. This file will include 7g.conf, which contains the conditional logic.
So we’ll be working with four configuration files in total:
- nginx.conf — includes
7g-firewall.conf - example.com — includes
7g.conf
example.com to match your own domain name.Installation
Here are the basic steps to implement 7G Nginx. Note that Nginx configurations may vary depending on web host and environment, etc. If in doubt, ask your web host.
Step 1: Add the files
First, download the 7G Nginx Firewall (ZIP file). Then unzip the download file to get the following:
7g-firewall.conf7g.conf
Add those two files to the /nginx/conf.d/ directory, as shown in the previous screenshot. Once those files are in place, they need to be included in your Nginx configuration.
Step 2: Include the firewall rules
In your main Nginx configuration file /nginx/nginx.conf, add the following include statement. This will include the file that contains the 7G firewall rules.
http {
	.
	.
	.
	include /etc/nginx/conf.d/7g-firewall.conf;
	.
	.
	.
}Make sure the path is correct based on the directory structure on your server.
Step 3: Include the conditional logic
In your local/site configuration file /nginx/sites-enabled/example.com, add the following include statement. This will include the file that contains the conditional 7G rules.
server {
	.
	.
	.
	include /etc/nginx/conf.d/7g.conf;
	.
	.
	.
}Again, make sure the path is correct based on the directory structure on your server.
Step 4: Restart the server
After making changes to your Nginx configuration, you need to restart the server in order for the changes to take effect. Consult your web host documentation for the best way to do this for your particular setup.
Step 5: Testing
At this point, you should have the two 7G files included in your Nginx configuration. And server restarted so the new rules are in effect. The next step is to begin thorough testing, to make sure that everything is working properly. You want to check that your site is operating normally. And also want to check that the 7G Firewall is working correctly, blocking bad requests and so forth.
Download
Note: The same license and disclaimer applies to both Apache and Nginx versions of 7G Firewall. For details, check out the License and Disclaimer on the 7G homepage.
For more information about 7G, check out the 7G Firewall homepage.
Feedback, bug reports, etc.
Questions about the Nginx version of 7G are welcome on this post. Or you can send an email via my contact form.
Thanks to..
Thanks to the following resources for their work on 7G Nginx:
Also thank you to everyone who contributed with feedback and testing the beta version. Your help is appreciated.
Source: Security Feed


