
When it comes to errors in Windows 10, memory leak may cause your PC to suffer the greatest error yet. Every type of computer usually deals with different types of errors, but dealing with memory leak is a whole new different thing. Your Windows 10 PC will experience continuous flows of memory usage when a memory leak happens. In case you see that type of malfunction caused by memory leak on your Windows 10 PC, you must fix it immediately.
No matter how great your Windows 10 PC is, the memory leak will eventually slow your computer’s performance. It usually starts off with the high memory usage caused by certain programs. When it continues, your Windows 10 PC will slow down.
The slowdown in performance has always caused many types of errors on Windows 10 PC. It causes a lot of programs to operate slowly, hence the system will crash. If the clashes within the programs extend for long, you will see a Blue Screen of Death error or sudden shutdown. When it becomes serious, the system will barely operate at a normal pace due to high memory usage. In this case, each program will have a hard time to operate on its own.
All in all, the memory leak can cause a lot of errors to happen. It is the source of the slowdown on the performance of your Windows 10 PC. To put a stop to it, you must fix the memory leak case on your Windows 10 PC immediately. Before you do this, you must know what is the deal with memory leak and what it can cause if you do not put a stop to it.
What is the Deal with Memory Leak?

Every computer must have memory space to operate. In this case, Windows 10 PC is included. When it comes to the computer operation, the memory space runs at certain capacities. Each program, service, and third-party applications will all use the memory space to run on a Windows 10 PC. In a normal situation, the memory usage for each program, service, and application will be managed accordingly.
Usually, each program, service, and application will only use a necessary amount of memory usage in a Windows 10 PC. If the memory leak happens, then the memory usage of a certain application or program will be unmanageable. In this case, the computer system will not be able to manage memory allocations.
When the memory leak happens, the unused memory will not get released. Furthermore, the memory leak can also happen when you cannot open a file in your computer storage. Although the running code has been entered, a certain problematic file still cannot be opened. When you encounter this problem, then the memory leak may have caused it to happen.
If you monitor the way the programs operate on your Windows 10 PC, you will see how much memory usage certain programs use. When you see a program uses more memory than necessary, you must try to find the reason why. If the program continues to use the memory more than it needs, then the problem may come from the memory leak. On the contrary to the unreleased memory, the high usage of memory may be released at a later time. Due to the nature of memory leak case in exhausting the system memory, it can cause the software affected to age faster than intended.
What Causes A Memory Leak to Happen
Certain programs may behave abnormally in your Windows 10 PC. You can see it from the way they use the high memory usage than intended. Usually, high memory usage will only occur when certain programs perform updates. In other words, high memory usage should only happen when needed.
Memory leak usually causes certain applications to operate or behave abnormally. Normally, you can access a program easily. However, you may not be able to open a program due to the memory leak. Some of the applications or programs on your Windows 10 PC may be prone to a memory leak in this case. That is why you must be aware of certain programs which may potentially get affected by the memory leak.
Some applications which are easily affected by memory leak are as follows:
- Java.
- Google Chrome.
- Applications and programs in C drive.
- Javascript.
Considering the programs above may operate the most, even in the background, the possibility of them getting affected by memory leak is high. If you still use Java in your Windows 10 PC, then it is possible certain programs operating with Java may experience a memory leak. Due to the dependency on the Java and Javascript, programs like Google Chrome and applications in the C drive may be more prone to memory leak compared to any other applications. Additionally, Chrome has a reputation for hogging resources the most compared to any other browsers. With the memory leak, the Chrome browser will experience a slowdown performance and more memory usage than the usual.
Signs of Memory Leaks on Windows 10 PC
In case your Windows 10 PC experiences memory leak, you may see a slowdown in performance along with the errors in applications. The memory leak itself takes a form in RAM memory loss in Windows. Usually, the leak comes from memory errors in a program or application.
Normally, a program or application will only take considerable memory usage to operate. When a program or application takes a lot of memory usage continuously, then the memory leak may play a role in it. In case the memory leak continues to happen, your Windows 10 PC may experience slow performance. The programs or applications which become the source of the errors may also become unresponsive. In return, all of the errors will present inconvenience during your time of operating your Windows 10 PC.
When your Windows 10 PC experiences a memory leak, you will not have to worry about the hardware. Usually, the memory leak comes from the software within your PC. In this case, you can perform various types of methods to fix the memory leak on your Windows 10 PC.
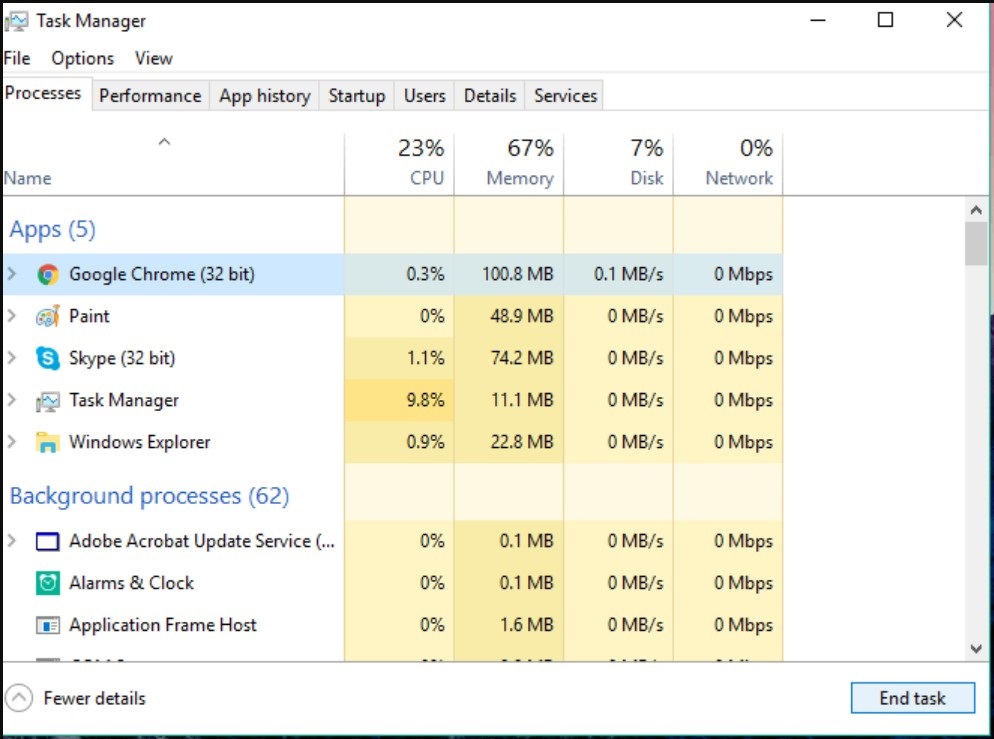
Checking Memory Leak from Task Manager
Since every single program or application is monitored through Task Manager, you can try to check the memory usage using the said Windows program. Due to the necessity of certain programs, the RAM usage tends to vary from one another. Usually, programs like Google Chrome and Adobe Photoshop may take a considerable amount of memory usage when in use. Some of the other programs may take smaller amounts of memory usage.
When a certain program behaves abnormally, you can check its memory usage on the Task Manager. From the Task Manager, you can see the memory usage of many programs in your Windows 10 PC. Some services, like Windows Modules Installer Worker, may take a lot of memory usage as well. Watch out for the abnormal activity from that service as well.
In order to open the Task Manager, you can simply press Ctrl, Shift, and Esc buttons at the same time. Alternatively, you can right-click on the Taskbar of your Windows 10 PC. Then, you can select the Task Manager among the choices presented on the screen.
Once you see the Task Manager window, you may head to the Processes tab. There, you can see how much each program or application uses the memory space. If you see a program which uses a lot of memory, then it means the memory leak occurs to it. Nevertheless, you should not take the high memory space usage of certain programs for granted. Take the RAM memory usage into consideration and determine which method you want to perform next.
What You Can Do to Fix A Memory Leak in Windows 10
RAM works around the programs or applications which need to operate. It usually stores data from the running processes of programs or application in your Windows 10 PC. In order for every program to operate on your computer, each of them must have easy access to RAM. It will allow the system to recognize the data of the programs since RAM stores all of the data within the programs in a Windows PC system.
Each program and application store the data in the RAM temporarily. This occurs so the other programs can use the RAM whenever one application stops using it. When your Windows 10 PC restarts, the memory space will be automatically be emptied for that reason.
Whenever a program or application opens, the memory will start to take a role in allowing it to operate. The considerable amount of memory will automatically be used for that program. Once the program closes, the memory usage it has been used will be back to its storage.
Due to the different needs of programs, memory usage will vary from one another. Any programs or applications which have to do more usually take a lot of memory usage than the others which do not. Eventually, the memory usage from one program or application to another will be adjusted to its need. In this case, you can see which program behaves abnormally and which one does not. If you see such an abnormal behavior, you must fix it immediately or else your Windows 10 will suffer from slow performance.
In order to perform a quick fix to the memory leak issue on your Windows 10 PC, you can try to perform these methods below.
Restarting Windows 10 PC
When you see a program uses more memory than necessary, you must try to find the reason why. If the program continues to use the memory more than it needs, then the problem may come from the memory leak. On the contrary to the unreleased memory, the high usage of memory may be released at a later time. Due to the nature of memory leak case in exhausting the system memory, it can cause the software affected to age faster than intended.
In order to fix this issue, you can try to observe each of the programs running on your Windows 10 PC from the Task Manager. Then, you can close it at once. First, you can open the Task Manager by pressing Ctrl, Shift, and Esc buttons at the same time. Alternatively, you can right-click on the Taskbar and select the option Task Manager from the options displayed. Proceed to find the programs which use an abnormal amount of memory and close it immediately.
Once you close the program, you can proceed to close the Task Manager window. Make sure no other programs open on your Windows desktop. Afterward, you can simply restart your Windows 10 PC. Since the RAM can only store the data of the programs on your Windows 10 PC while they run, it will not operate when the computer shuts down. Once the Windows 10 PC turns back on, the RAM will be empty. In other words, the memory leak will not exist any longer.
Using the Memory Diagnostic Tool to Scan Memory Leak
In case you want to dig more into the memory leak issue on your Windows 10 PC, you can try to use the memory diagnostic tool to scan for the source of the problem. With this tool, you can scan for bad memory sectors as well as memory leak on your Windows 10 PC.
Since the memory diagnostic tool can be operated from your Windows 10 system instantly, you will not need to install any programs to run the scanning of your RAM in your Windows 10 PC. Whenever your Windows 10 PC experiences a problem, including a memory leak, you can always rely on the memory diagnostic tool to find the source of the problem.
In order to open the memory diagnostic tool, you can follow the steps below.
Step 1: Proceed to go to the Windows Search.
Step 1: Then, you can type “memory diagnostic tool” on the search bar.
Step 1: Afterward, you can choose the Memory Diagnostic Tool from the list of options presented.
Step 1: To immediately run the tool, you can choose the option “Restart now and check for problems”.
Step 1: Make sure to save and close the works you are currently working on before you restart your Windows 10 PC.
Step 1: Once the booting process engages, the Memory Diagnostics Tool will begin operating.
Step 1: With the memory diagnostic tool, you can perform a basic scan in the memory system.
Step 1: Additionally, you can also perform an Advanced scan.
The methods you have seen above may only fix the memory leak issue temporarily. In case you want to fix the problem permanently, you can try to properly perform methods to prevent the problem from even occurring. What you need to do is mostly maintaining the system service in your Windows 10 PC.
Methods to Fix A Memory Leak on Windows 10
When your Windows 10 PC experiences memory leak, you may see a slowdown in performance along with the errors in applications. The memory leak itself takes a form in RAM memory loss in Windows. Usually, the leak comes from memory errors in a program or application.
Normally, a program or application will only take considerable memory usage to operate. When a program or application takes a lot of memory usage continuously, then the memory leak may play a role in it. In case the memory leak continues to happen, your Windows 10 PC may experience slow performance. The programs or applications which become the source of the errors may also become unresponsive. In return, all of the errors will present inconvenience during your time of operating your Windows 10 PC.
If your Windows 10 PC experiences a memory leak, you will not have to worry about the hardware. Usually, the memory leak comes from the software within your PC. In this case, you can perform various types of methods to fix the memory leak on your Windows 10 PC.
Because of the different needs of programs, memory usage will vary from one another. Any programs or applications which have to do more usually take a lot of memory usage than the others which do not. Eventually, the memory usage from one program or application to another will be adjusted to its need. In this case, you can see which program behaves abnormally and which one does not. If you see such an abnormal behavior, you must fix it immediately or else your Windows 10 will suffer from slow performance.
To make sure the memory leak can be fixed, you can simply try to perform a couple of updates we have curated below. Try to perform each one of the methods and see which one works to fix the problem.
Updating Drivers on Windows 10 to Fix Memory Leak
When you have outdated drivers on your Windows 10 PC, then many types of errors can occur. Aside from the system suffering the problems, the outdated drivers can also cause memory leaks. Since the settings of the drivers cannot be adjusted to the current version of the system, the memory usage usually will take much than intended. Therefore, you can try to fix the memory leak issue on your Windows 10 by updating the outdated drivers on your Windows 10 PC.
If you have read a couple of articles regarding driver updates, you must know there are ways to do it. To update the drivers on your Windows 10 PC, you can go to the Device Manager. In order to perform the updates from Device Manager, you can follow the steps below.
Step 1: Proceed to go to Windows search.
Step 2: There, you can type devicemng and open Device Manager from the search list.
Step 3: Scan for the drivers which need to be updated. If you see any drivers with yellow exclamations next to them, then you must perform an update on them.
Step 4: Once you find the problematic drivers, you can right-click on each one of them one after another.
Step 5: Then, you can select the option “Update driver software”.
Step 6: Proceed to follow the instructions on the display to complete the updating process.
Step 7: When the updating process finishes, the drivers will be updated to the latest version.
Removing Malware to Fix A Memory Leak in Windows 10 PC
If you ever experience any errors on your Windows 10 PC, you must always check for any malware in it. Usually, malware can plague the files within the system without you knowing it. What indicates the malware infection is the slowdown in the performance.
What you must do to prevent the malware from contaminating your system is to remove it. You can use Windows Defender to scan all the possible threats in your Windows 10 PC. Perform a full scan to get better results of the possible infections in your system.
If you want to get better results, you can also scan your Windows 10 PC using a third-party antivirus. Just make sure that the antivirus does not clash with the Windows Defender while doing its job. In case the antivirus proves to be problematic, you can also try to uninstall it. Check whether or not the memory leak has been fixed.
Setting Up the System for Best Performance
When it comes to fixing errors in a Windows 10 PC, you can perform some adjustments in the system. In this case, you can set up for the best performance on your Windows 10 PC. This trick may very well fix the problem with the memory leak in your PC’s system. Once you set up the best performance, you will get to adjust the processor scheduling and memory usage. In return, you will get to fix the memory leak and the system performance in your Windows 10 PC as well.
In order to set up your Windows 10 system for the best performance, you can run the Windows Advanced Tool. To do so, you can follow the steps below.
Step 1: Proceed to open the File Explorer on your Windows 10 PC.
Step 2: Then, you can right-click on This PC.
Step 3: On the left panel, find the option “Advanced system settings” and click it.
Step 4: Then, you can proceed to go to the “Advanced” tab.
Step 5: Afterward, you can go to the “Settings” under the “Performance” tab.
Step 6: Next, you can find the option “Adjust for best performance” option.
Step 7: At last, you can click on the option OK and close the window.
Step 8: Make sure to restart your Windows 10 PC to save and apply the changes.
Once your Windows 10 PC turns back on, you can check whether or not the memory leak still occurs. In case your Windows 10 PC operates normally, without a slowdown, then you can tell the memory leak has been fixed.
Disabling the Programs Running at Startup
When the memory leak problem comes from a program in Startup, then you will see an error whenever you turn your Windows 10 PC on. Usually, you will end up in a loop when one of the startup programs experience a problem. In this case, you must disable the problematic problem which experiences memory leak to fix the error in the system.
Just like the normal check of memory usage on a Windows PC, you can look for the program in the Startup which shows memory leak on the Task Manager. If the program that takes a lot of memory usage happens to run on Startup too, you can simply disable it.
In order to know which one of the Startup programs you need to disable, you can follow the steps below.
Step 1: Proceed to open the Task Manager on your Windows 10 PC.
Step 2: Afterward, go to the Startup tab.
Step 3: Then, you can see the program which experiences an abnormal memory usage.
Step 4: Proceed to right-click on it.
Step 5: Next, you can choose the option “Disable” from the list of options on the display.
Once you disable the problematic program on the Startup, you will not see a restart loop caused by the memory leak again.
Cleaning Windows Registry
Perhaps disabling programs on Startup may not fix the issue with the memory leak. In case you still wish to fix the memory leak caused by the programs within the system, you can try to clean the Windows registry. All you have to do is to use a program like CCleaner to do the job. The program works similarly to an antivirus.
All you have to do is check the drive and programs you wish to scan. What makes it different is it scans for problems in the registry instead of files only. Once it finishes scanning, it will fix the issues found within the system. Wait for a while until the program finishes fixing the issues. After that, you can restart your Windows 10 PC and check whether or not the memory leak problem has been solved.
Hacking the Registry
If cleaning the registry does not fix the memory leak on your Windows 10 PC, you can try to hack into it instead. In order to do so, you can follow the steps below.
Step 1: Proceed to go to Windows Search.
Step 2: Afterward, you can type regedit to get to the “Registry Editor”.
Step 3: Then, you can type the following path to the search bar: HKEY_LOCAL_MACHINESYSTEMCurrentControlSetControlSession ManagerMemory Management.
Step 4: Proceed to locate the ClearPageFileAtShutDown and modify its value to 1.
Step 5: Then, you can save the changes by clicking the option OK.
Step 6: At last, you can restart your Windows 10 PC to apply the changes.
Disabling Runtime Broker
Due to many services running in the Windows system, sometimes the problem, such as memory leak, may happen. In this case, you may find the Runtime Broker takes a lot of memory to operate. Normally, the Runtime Broker takes a few amounts of memory to operate. However, it can take up a lot due to the memory leak.
In order to disable the Runtime Broker, you can follow the steps below.
Step 1: Proceed to open Task Manager first.
Step 2: Find the Runtime Broker process.
Step 3: Once you find it, you can right-click on it.
Step 4: Afterward, you can choose the option “Disable”.
In case the disabled Runtime Broker does not do the job in fixing the memory leak issue, you can try to disable other programs which potentially take a lot of memory than intended. Once you find the suspicious processes or programs which use a lot of memory, you can disable it at once using this same method.
Defragmenting Hard Drives in Your Windows 10 PC
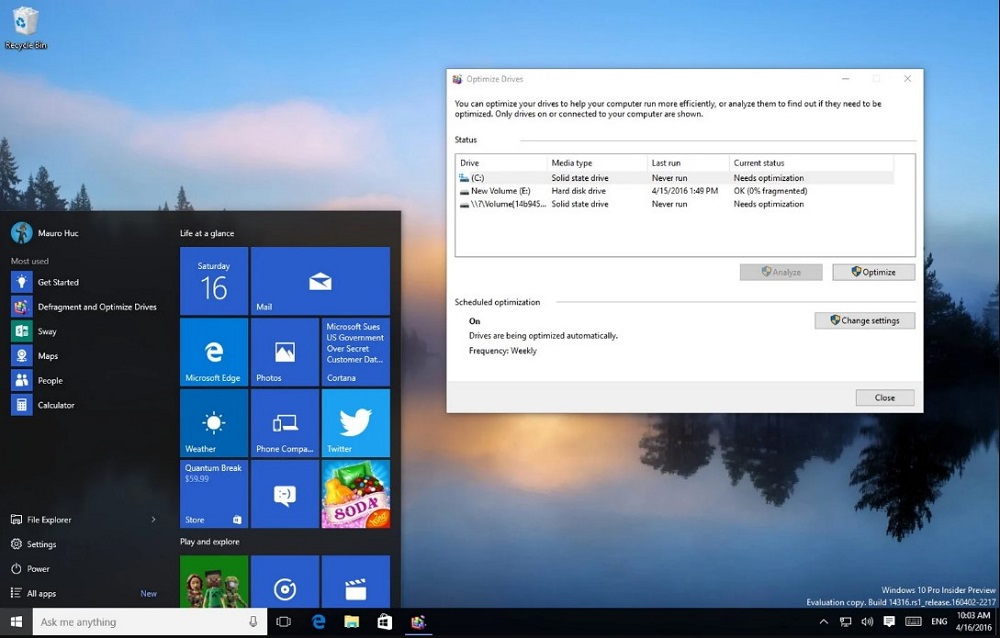
In order to clean your Windows 10 PC from memory leak, you can always try to defragment the hard disks. Each hard drive in your Windows 10 PC has a lot of files in its storage. Therefore, you can always defragment the hard drives to improve the memory management of the system.
To defragment the hard drives in your Windows 10 PC, you can follow the steps below.
Step 1: Proceed to go to “This PC” by opening the File Explorer or Windows Desktop.
Step 2: After you find it, you can right-click on the driver C: which currently acts as the storage for your Windows 10 OS.
Step 3: Then, you can go to the Tools tab.
Step 4: Find the option “Optimize” and click on it.
Step 5: Proceed to choose the drive you wish to defrag.
Step 6: Then, you can choose the option “Analyze”.
Step 7: The scanning process will begin at once.
Step 8: You can wait until the scanning process finishes.
Step 9: Once the defragmenting process finishes, you can restart your Windows 10 PC.
Step 10: After the Windows 10 PC turns back on, you can check whether or not the memory leak still occurs.
Disabling Service Host: Superfetch
If you use Windows 10 PC, you must have heard a thing or two about Service Host: Superfetch. This Windows service is used to optimize the performance of the system. With this service, your Windows 10 system can manage the RAM, decrease the booting time, and load each program or application efficiently.
Nonetheless, the Service Host: Superfetch can actually slow down the performance of your Windows 10 PC. In order to disable the Superfetch, you can follow the steps below.
Step 1: Proceed to open the Run box by pressing Windows and R buttons at the same time.
Step 2: Afterward, you can type services.msc to open the “Services” window.
Step 3: Then, you can find the process named “Superfetch”.
Step 4: Proceed to right-click on it.
Step 5: Afterward, you can select the option “Properties”.
Step 6: Then, you can choose the option “Stop” to stop the service.
Step 7: You can also choose the option “Disable” from the Startup Type. Do keep in mind that disabling the Superfetch may cause some errors in the later time. If you are sure of it, then you can proceed with it.
Step 8: At last, you can restart your Windows 10 PC to apply the changes.
Disabling Windows Tips and Tricks
With the new operating system usually comes a new feature. The Windows 10 has a new feature called Tips and Tricks which is new to many users. Just like its name, the Tips and Tricks show how to navigate your way around the Windows OS.
Even though this feature intends to help, most users tend to know their way around the Windows 10 OS easily. Thus, it makes the feature consumes memory space for nothing. To lessen the memory usage, you can try to disable the Windows Tips and Tricks.
In order to perform this method, you can follow the steps below.
Step 1: Proceed to head to the Start Menu.
Step 2: Find the Settings program.
Step 3: Afterward, you can go to the System.
Step 4: Then, you can head to the “Notifications & actions”.
Step 5: Look for the option “Get tips, tricks, and suggestions as you use Windows” and uncheck all of them.
Adding More RAM
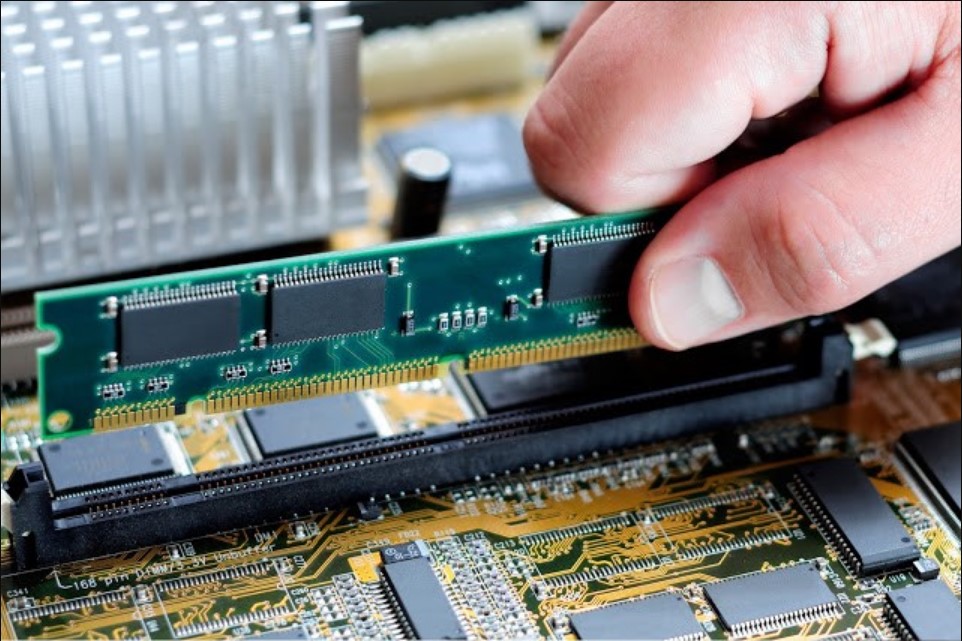
When your Windows 10 PC runs low on RAM, then the memory leak may not entirely be the case of the error. Usually, the way to fix the memory leak is to add more RAM. You can do so by taking your Windows 10 PC to the service center. Check your PC and see if an expert technician can do it for you.
Checking on System Requirement
The problem with the memory leak usually deals with something deep in the system. Checking for the system requirement can benefit you in knowing where to look when memory leak attacks your Windows 10 PC. In doing so, you will know how much RAM you can use to help the applications in your Windows 10 PC running. This way, you can upgrade the RAM memory in a way that is compatible with your Windows system.
Conclusion
In a time where the memory leak happens, the unused memory will not get released. Furthermore, the memory leak can also happen when you cannot open a file in your computer storage. Although the running code has been entered, a certain problematic file still cannot be opened. When you encounter this problem, then the memory leak may have caused it to happen.
When your Windows 10 PC experiences memory leak, you may see a slowdown in performance along with the errors in applications. The memory leak itself takes a form in RAM memory loss in Windows. Usually, the leak comes from memory errors in a program or application.
Usually, a program or application will only take considerable memory usage to operate. When a program or application takes a lot of memory usage continuously, then the memory leak may play a role in it. In case the memory leak continues to happen, your Windows 10 PC may experience slow performance. The programs or applications which become the source of the errors may also become unresponsive. In return, all of the errors will present inconvenience during your time of operating your Windows 10 PC.
Since each program needs different treatment, fixing the memory leak usually revolves around different methods as well. Any programs or applications which have to do more usually take a lot of memory usage than the others which do not. Eventually, the memory usage from one program or application to another will be adjusted to its need. In this case, you can see which program behaves abnormally and which one does not. If you see such an abnormal behavior, you must fix it immediately or else your Windows 10 will suffer from slow performance.
Source: Security Feed