
How do you find the right balance of usability and security? How do you control what security notifications are shared with your client? Configuring security on a client’s website can be a daunting task, but it doesn’t have to be. In this post, we are going to show you how to configure iThemes Security Pro on your client’s website quickly.
How to Configure iThemes Security Pro on Your Clients Site Webinar Replay
Checkout a replay of the webinar we did on the same topic.
Here is a quick overview of what we are going to cover.
- How to Configure iThemes Security Pro Notifications
- WordPress Security for Different User Types
- Using iThemes Security Pro User Groups
- How to Create a Security Client Dashboard
- How to Automate Vulnerability Checks & Patching
- Temporary Privilege Escalation
1. How to Configure iThemes Security Pro Notifications
iThemes Security Pro shares critical information about the health of your website’s security. However, these messages can create unnecessary headaches if your clients misunderstand them. You can make your life a lot easier if you are sharing security notifications with the right people.
Let’s quickly cover the 5 places that you can your clients can find security notifications.

- Message Center Notifications – All your critical alerts and updates can be found in the iThemes Security Message Center located in the WordPress admin bar.
- Email Notifications – Security notifications like the Security Digest and Lockout Notifications can be sent to your inbox.
- Login Alerts – When Trusted Devices is enabled, you will use the Login Alert menu to either confirm or block a device.
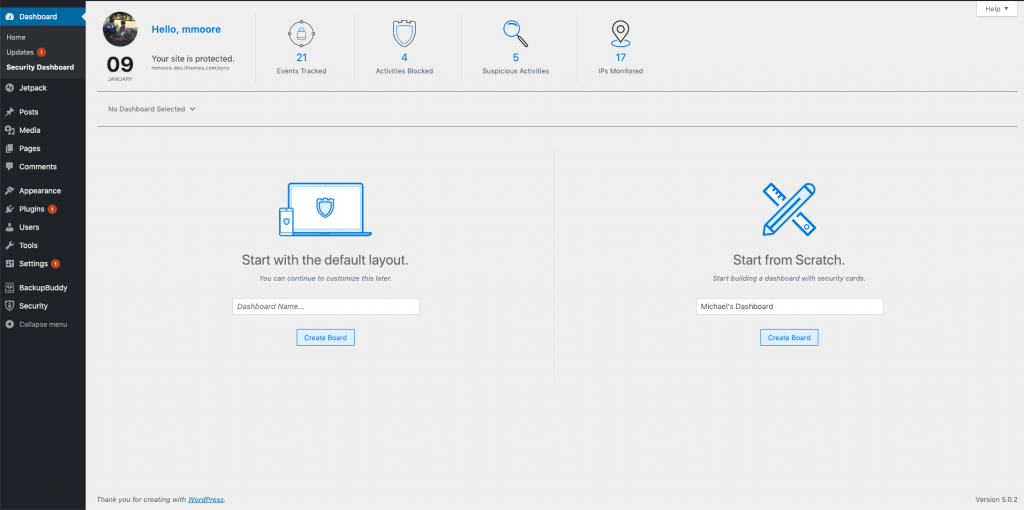
- Security Dashboard – The Message Center can also be found on the Security Dashboard.
- Security Logs – Now, this isn’t a notification in the traditional sense, but iThemes Security Pro uses the security logs to share security-related events with you.
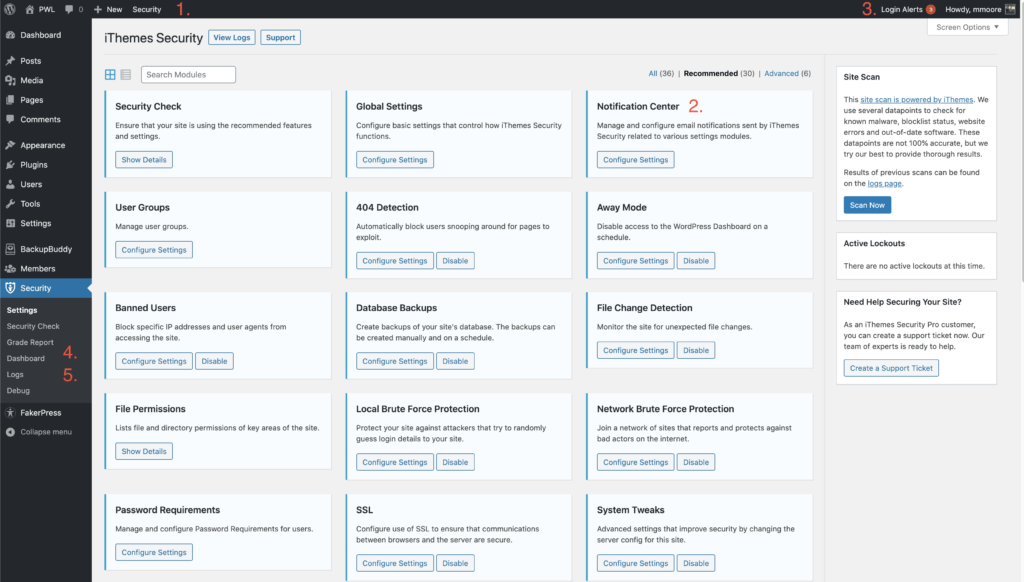
iThemes Security Notification Center
The Notification Center has all of the tools you need to manage the email notifications generated by iThemes Security Pro.
The Notification Center module is located on the main page of the security settings. Click the Configure Settings button to start customizing your email notifications.

The first two things you want to set up in the Notification Center are the From Email and the Default Recipients list.

The From Email is the email address iThemes Security Pro will use to send notifications. The Default Recipients is the list of people that will receive email notification unless otherwise specified. It may be a good idea to only have your user set as the default recipient to prevent your clients from receiving unwanted emails.
You can also customize the recipients for each email notification sent from iThemes Security Pro. Let’s say that the only email notification you want your client to see is the Security Digest. To do this, scroll down to the Security Digest email settings and click the Recipient toggle and select Custom.

Check the box next to your client’s username to add them to the Security Digest email list.

While we’re talking about the Security Digest email, let’s talk about how you can reduce the number of emails you receive from iThemes Security Pro. During periods of heavy attack, iThemes Security can generate a LOT of emails. However, these emails can create a bunch of unnecessary noise. For example, the Lockout Notifications are just iThemes Security Pro bragging that it is doing its job, but there isn’t any action for you to take. The bad guy is already locked out, problem solved. That said, if receiving a ton of notifications becomes the norm, it could turn into a boy who cried wolf scenario. The one time you receive an alert that does require your action, you may ignore it because you are continually receiving non-urgent notifications.
The Security Digest reduces the number of emails sent so you can receive a summary of lockouts, file change detection scans, and privilege escalations. Keep in mind that you will still need to disable the individual notifications to stop receiving them.
We will show you how to stop your clients from seeing other types of notifications later in the post.
2. WordPress Security for Different User Types
A lot of WordPress security boils down to user security. And, not all users are created equal, so we shouldn’t have a one size fits all user security strategy. That is why it is worth talking about the different types of users you might have on a website.
- Site Admins – Site Admins have the power to make a ton of changes on a WordPress website. With great power comes great responsibility. A lot of times, security means sacrificing a little bit of convenience for a much more significant gain in security. It is okay to add a little friction for these users because if their accounts ever fall into the wrong hands, you can kiss your site goodbye.
- Shop Managers – Shop Managers have the same power as a site admin and require the same high level of security. You might have a client that needs to manage the WooCommerce shop, but you may not want them messing with the site’s security settings. We will show how you can accomplish this in the next section.
- Contributors/Editors – Contributors and Editors still deserve your attention because they can make changes to your site. Yet, they may not need as high of a level of security as your site admins and shop managers.
- Subscribers/Customers – Subscribers and Customers are low-level users that can’t make changes on a WordPress website. While you probably want to give them the tools to protect their account, you probably don’t want to force them to use them.
3. Using iThemes Security Pro User Groups
Users Groups module in iThemes Security Pro allows you to quickly see which settings that can affect the user experience are enabled and make modifications to them from a single location.
To make it easier to manage the user security on your site, iThemes Security Pro sorts all of your users into different groups. By default, your users will be grouped by their WordPress capabilities. Sorting by WordPress capabilities allows for easy combining of WordPress and custom user roles into the same group. For example, if you are running a WooCommerce site, your site Administrators and Shop Managers will be in the Admin User Group, and your Subscribers and Customers will be in the Subscriber User Group.
Now that we have talked about the different types of users on a WordPress Website let’s take a look at using User Groups to configure our user security quickly. In this section, you will learn how to configure the security for your site Admins and Subscribers.
In the User Groups settings, select your Administrator User Group to start editing this group. The Features tab show which settings are enabled or disabled for the group, and the Edit Group tab allows you to configure the members of the group.
As we talked about earlier, we are going to want a high-level of security for our Admin User Group.


- Manage iThemes Security – Our Admin users will need the ability to manage the security settings.
- Enable Dashboard Creation – We want our Admin users to create Security Dashboard.
- Grade Report – Our Admin users should have access to the grade report.
- Disable Two-Factor Onboarding – We want to make enrolling in 2fa as easy as possible.
- Allow Remembering Device – We may want to require our Admin users to enter a two-factor token on every login for increased security.
- Activity Monitoring – We will want a history of the site activity of our Admin users.
- Passwordless Login – We can let everyone use this safe and convenient login method.
- Allow Two-Factor Bypass for Passwordless Login – This is a personal preference. Not allowing the bypass of 2fa will increase the security of your Admin logins.
- Trusted Devices – We want to restrict the access to our Admin dashboard to a list of approved devices.
- Refuse Compromised Passwords – Don’t let your Admin user reuse passwords that have been found in database breaches.
As we talked about earlier, we don’t want the same high-level of security for our Subscriber User Group.


- Manage iThemes Security – We don’t want our low-level users to have access to the security settings.
- Enable Dashboard Creation – We don’t want low-level users creating Security Dashboards.
- Grade Report – Low-level users shouldn’t see the Grade Report.
- Disable Two-Factor Onboarding – While we want to give our low-level users the option to use 2fa, we may not want them to see the onboarding flow when logging in.
- Allow Remembering Device – You may not want to add this level of complexity to low-level user accounts.
- Activity Monitoring – We don’t want to monitor the activity of our low-level users.
- Passwordless Login – We can let everyone use this safe and convenient login method.
- Allow Two-Factor Bypass for Passwordless Login
- Trusted Devices – You may not want to add this level of complexity to low-level user accounts.
- Refuse Compromised Passwords – You probably shouldn’t even let your low-level users use compromised passwords on your site.
We talked earlier about how we may want our Shop Managers to have the same high-level of security as our Admin Users but restrict them from managing the security settings. We can create a new User Group just for our Shop Managers and we can enable all of the same features as we did for our Admin Users besides the ability to manage the security settings, create security dashboards or view the grade report. Doing this will also prevent them from seeing the security notifications we discussed earlier.

4. How to Create a Security Client Dashboard
Looking at your WordPress security, log entries can be time-consuming and even confusing to understand. The iThemes Security Dashboard brings your security logs to life by pulling together related listings and displaying it in a way that is relevant to you.
The Security Dashboard is also a great way to show your client why they are paying you to secure their site. Let’s take a look at how you can create a share a dashboard with your client.
Once you’ve enabled the dashboard, you can view it from both the Admin Dashboard and Security settings in your WordPress Admin menu.

Next, you can create a new dashboard using the iThemes Security default dashboard or create one from scratch. Enter a name for your board and then click the Create Board button.
After configuring the dashboard to your liking, you can click the Share button.

Then select the user that you want to share it with.

5. How to Automate Vulnerability Checks & Patching
Did you know that #1 reason websites get hacked are vulnerabilities for which a patch was available but not applied? Don’t give hackers an easy way to exploit your client’s websites. The new iThemes Security Pro Site Scanner automatically scans your website for known WordPress core, plugin, and theme vulnerability. And if a patch is available. The Site Scanner will even automatically apply the security patch to fix the vulnerability.
Enable the Site Scanner on the main page of the security setting to have your site scanned twice-daily for known vulnerabilities, malware, and the site’s Google blocklist status.

You will need to enable the Auto Update If Fixes Vulnerability option in the Version Management settings to give iThemes Security Pro permission to apply the security fixes automatically.

6. Temporary Privilege EscalationHow to Configure iThemes Security Pro Blog Post
Maybe the most underutilized feature in all of iThemes Security Pro, the Privilege Escalation feature, allows you to escalate the privileges of a single user temporarily.
Anytime you create a new user, especially an Admin user, you are adding an extra entry point for a hacker to exploit. But there are times you may need some outside help.
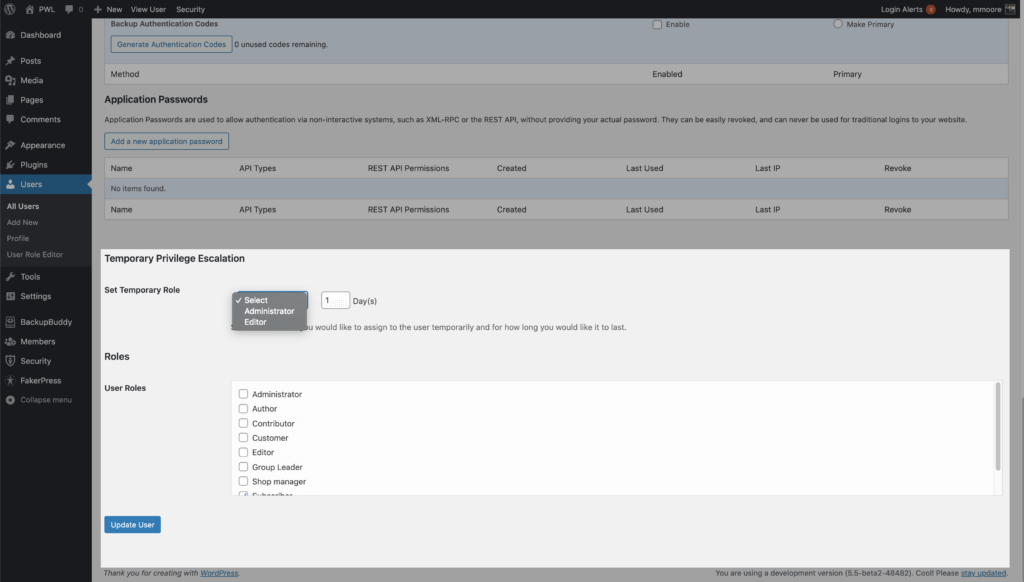
You can create a new Support user and give it the Subscriber user role. The next time you need to provide temporary access to someone navigate to your Support user’s Profile page.
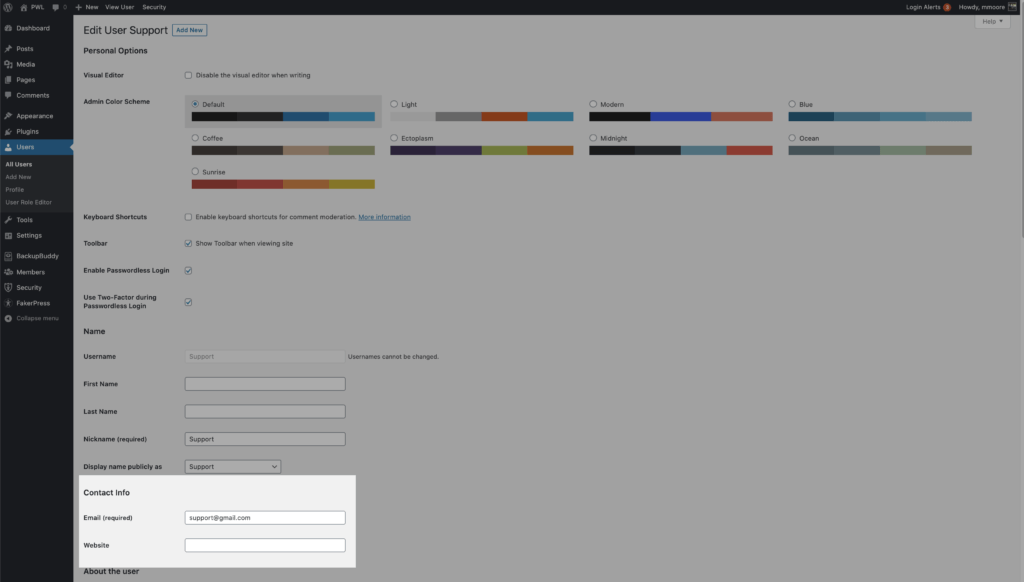
Update the email address to allow the person to request a new password and then scroll down until you see the Temporary Privilege Escalation settings. Click the Set Temporary Role toggle, and select Admin. The user will now have Admin access for the next 24 hours. If they don’t need the full 24 hours, you can revoke the privilege escalation from the user profile page.
Wrapping Up
Configuring security on a client’s site doesn’t have to be daunting. iThemes Security Pro provides you with the tools you need to apply the right amount of security to the right people, restrict access to sensitive security information to only the people managing the security.
The post How to Configure iThemes Security Pro on Your Clients Site appeared first on iThemes.
Source: Security Feed