
iThemes Security Pro is jam-packed full of 50+ security methods to secure and protect your WordPress website. That is a ton of options!
If you find yourself not knowing where to start after installing iThemes Security Pro, don’t worry, we’ve got you covered. In this post, we will cover the top 10 things to do after installing iThemes Security Pro.
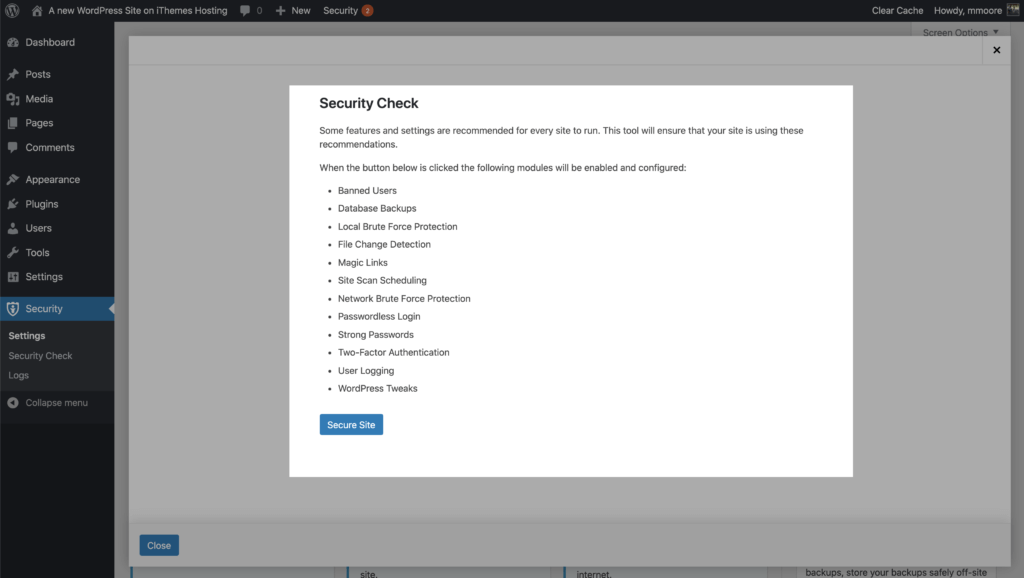
1. Run the Security Check
There are several reasons that you will want to run the iThemes Security Pro Security Check. The Security Check enables all of the iThemes Security Pro settings that play nicely in all environments, including those with limited resources.

Let’s talk about the settings that are enabled by the Security Check.
- Local Brute Force Protection – The Local Brute Force Protection feature keeps tracks of invalid login attempts made by IPs and usernames. Once an attacker has made too many consecutive invalid login attempts, they will get locked out.
- Banned Users – The Banned Users feature keeps track of IP lockouts. Once an IP has become a repeat offender, iThemes Security Pro will add the IP to the Banned Hosts list and prevent the IP from being able to view your website, let alone try to login.
- Database Backups – The Database Backups feature creates backups of your site’s database.
- Magic Links – The Magic Links feature allows you to request an email with a unique login link when your username is locked out. Using the emailed link will allow you to bypass the lockout, while the brute force attackers remained locked out.
- Passwordless Login – The Passwordless Login feature is a new way to verify a user’s identity without actually requiring a password to login.
- Site Scan – The Site Scan checks your site for known vulnerabilities and automatically apply a patch if one is available.
- Two-Factor Authentication – Two-Factor Authentication is a process of verifying a person’s identity by requiring two separate methods of verification.
- User Logging – The User Logging feature does exactly what you think; it logs user actions such as logging in, and saving content.
- WordPress Tweaks – Not all of the WordPress Tweaks options are enabled by the Security Check. Essential security methods like Disabling the File Editor, Blocking Multiple Authentication Attempts per XML-RPC Request, Restricting REST API Access, and Mitigate Attachment File Traversal Attack are enabled.
Running the Security Check will also help prevent any inadvertent server lockouts by identifying your website’s server and loopback IPs. The Security Check will also verify the remote IPs hitting your website to protect against IP spoofing.
In addition, the Security Check… checks to see if your server has an SSL certificate enabled and if your HTTP page requests are being redirected to HTTPs. A page that is loaded using HTTPs protects your visitors with SSL encryption. You force HTTPS redirect from the Security Check menu.
Finally, the Security Check will prompt you to activate your Network Brute Force Protection license. The Brute Force Network helps iThemes Security users protect each other. IPs that get blocked for attacking your website, along with the blocked IP of other websites protected by iThemes Security, will get reported to the Brute Force Network. Once an IP is in the Brute Force Network, they will be blocked from all sites in the network.

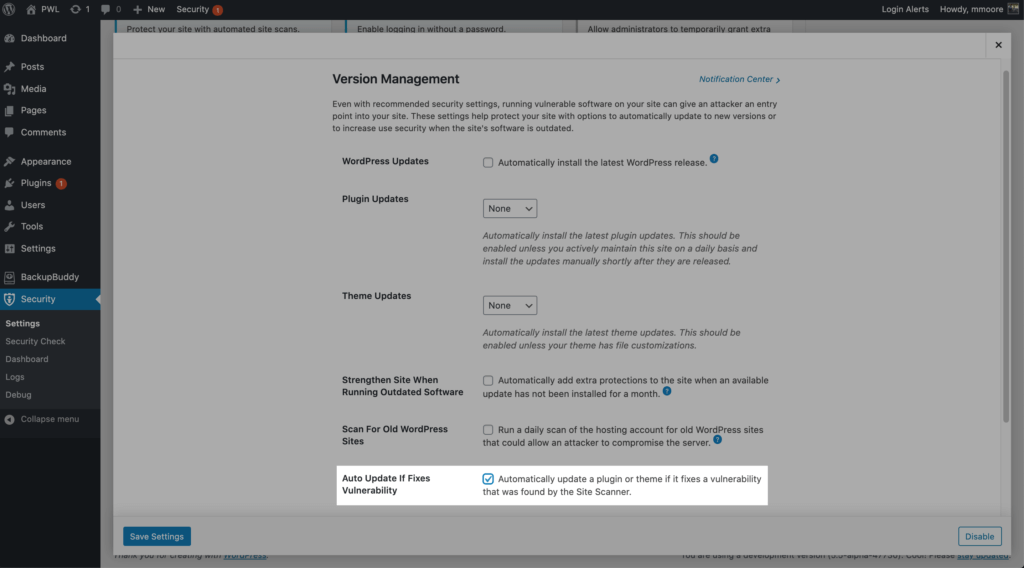
2. Enable Automatic Vulnerability Patching
The Security Check enables the Site Scan which will automatically check your website for known WordPress, plugin, and theme vulnerabilities. This is great, but iThemes Security Pro can go one step further. If a vulnerability is found on your website iThemes Security Pro can automatically apply a patch if one is available.
All you need to do is enable the Auto Update If Fixes Vulnerability option in the Version Management settings.
3. Block Bad Bots with Google reCAPTCHA v3
The Google reCAPTCHA feature in iThemes Security Pro protects your site from bad bots. These bots are trying to break into your website using compromised passwords, posting spam, or even scraping your content. reCAPTCHA uses advanced risk analysis techniques to tell humans and bots apart.
What’s great about reCAPTCHA version 3 is that it helps you detect abusive bot traffic on your website without any user interaction. Instead of showing a CAPTCHA challenge, reCAPTCHA v3 monitors the different requests made on your site and returns a score for each request. The score ranges from 0.01 to 1. The higher the score returned by reCAPTCHA, the more confident it is that a human made the request. The lower this score returned by reCAPTCHA, the more confident it is that a bot made the request.
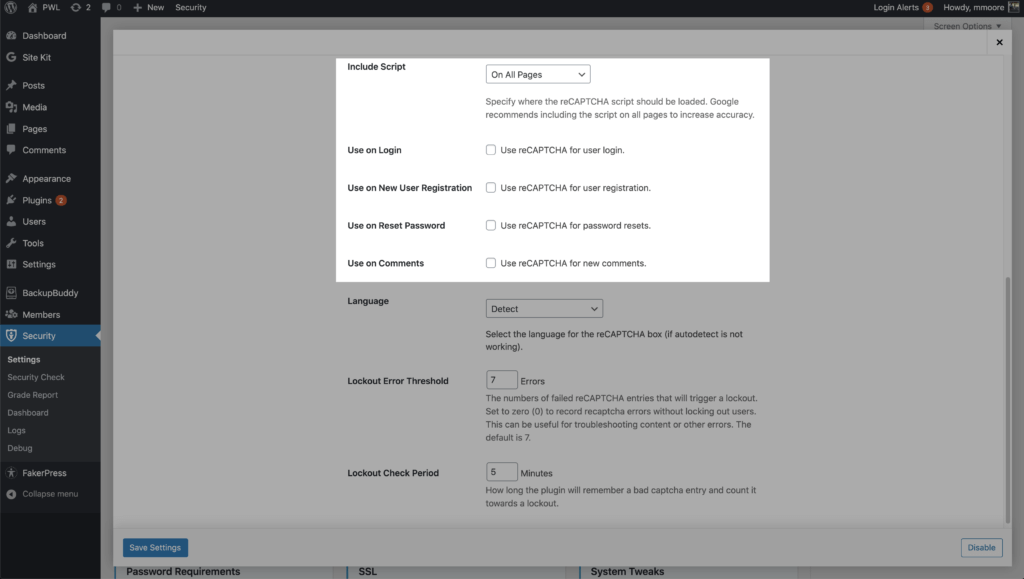
iThemes Security Pro allows you to set a block threshold using the reCAPTCHA score. Google recommends using 0.05 as your default. Keep in mind that you could inadvertently lock out legitimate users if you set the threshold too high.
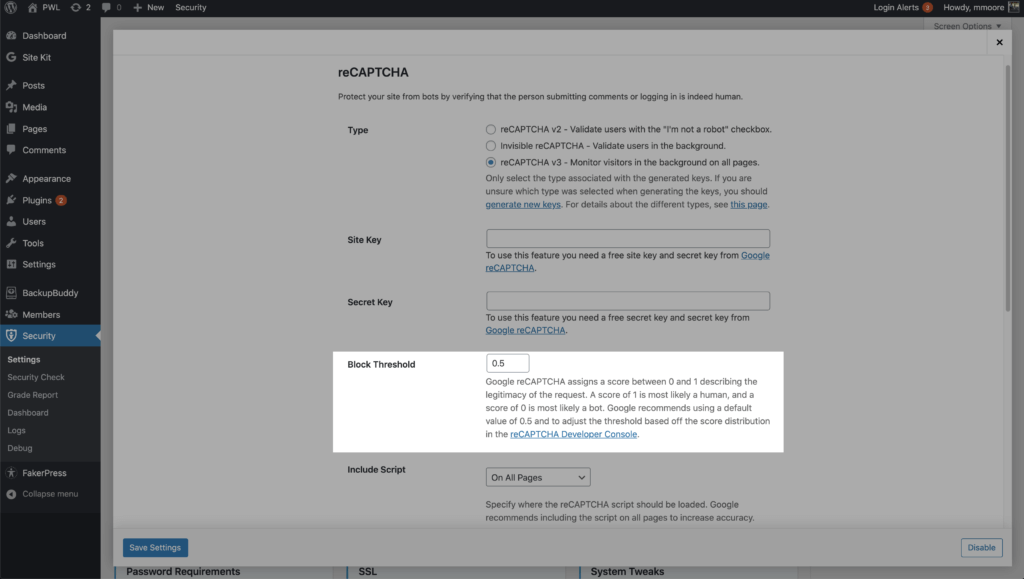
You can enable reCAPTCHA on your WordPress user registration, reset password, login, and comments. iThemes Security Pro allows you to run the Google reCAPTCHA script on all pages to increase the accuracy of its bot vs. human score.
4. Secure Your User Account With a 2FA App
iThemes Security Pro offers you three different methods of two-factor authentication to secure WordPress users.
- Mobile App – This method requires you to use a free two-factor mobile app like Authy.
- Email – The email method of two-factor will send time-sensitive codes to your user’s email address.
- Backup Codes – A set of one-time use codes that can be used to login in the event the primary two-factor method is lost.
The mobile app method is the most secure, so let’s take a look at how you can add this level of security to your user.
The first thing that you need to do is download a 2fa app like Authy and then navigate to your WordPress User Profile page. Once you are in your WordPress profile, scroll down until you see the Two-Factor Authentication Options heading. Be sure to check the boxes to enable the Mobile App method and make it your primary form of 2fa. Now click the View QR Code & Secret Key button.

From your phone, scan the QR code to continue to link the secret to your mobile app.

Now enter the 6 digit code from your phone into your web browser and click Verify to finish the setup.
5. Create a Security Dashboard
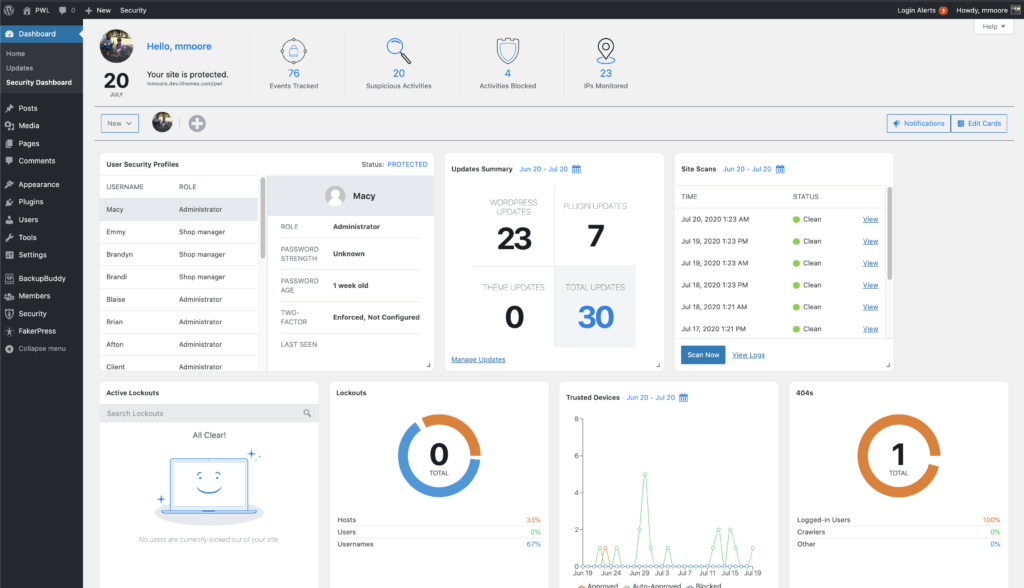
The iThemes Security Dashboard is a dynamic dashboard with all your website’s security activity stats in one place. The Security Dashboard brings your security logs to life by pulling together related entries and displaying it in a way that is relevant to you.
The dashboard sorts your website’s security activity into Security Cards. Think of them like baseball cards. Baseball cards don’t give you information about every player in the MLB. The cards only care about the guy pictured on the front. Likewise, the Security Cards don’t show you every entry in the log. Instead, they only offer you information related to that specific card.
The 11 Security Cards
1. Site Scans
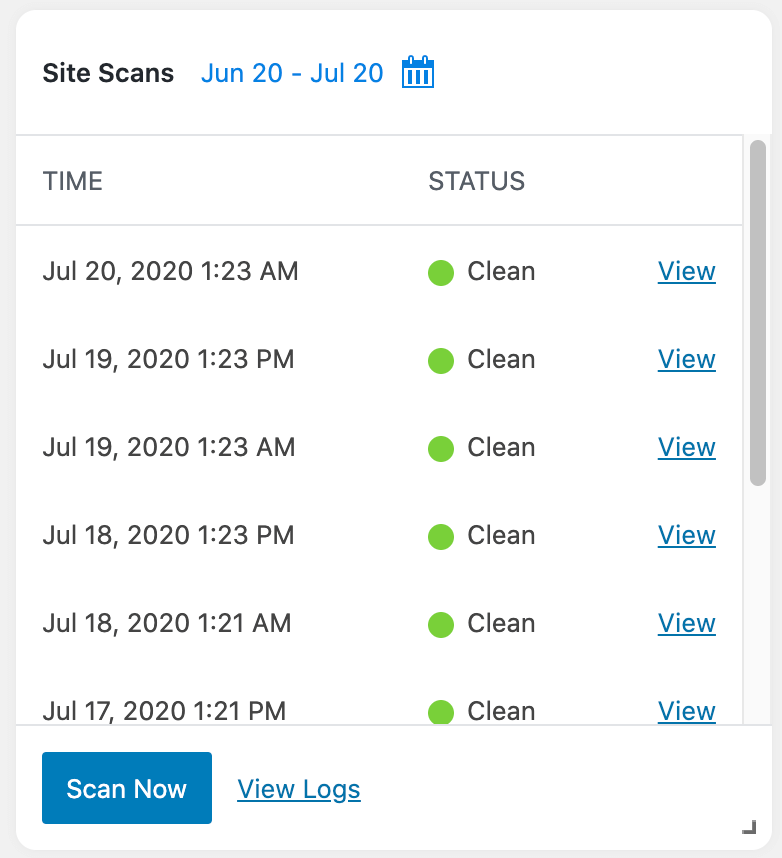
See the history of your iThemes Security Pro Site Scans.
2. User Security Profiles

See a list of every admin user on the site. Click on any username to get their security overview.
3. User Security Profile
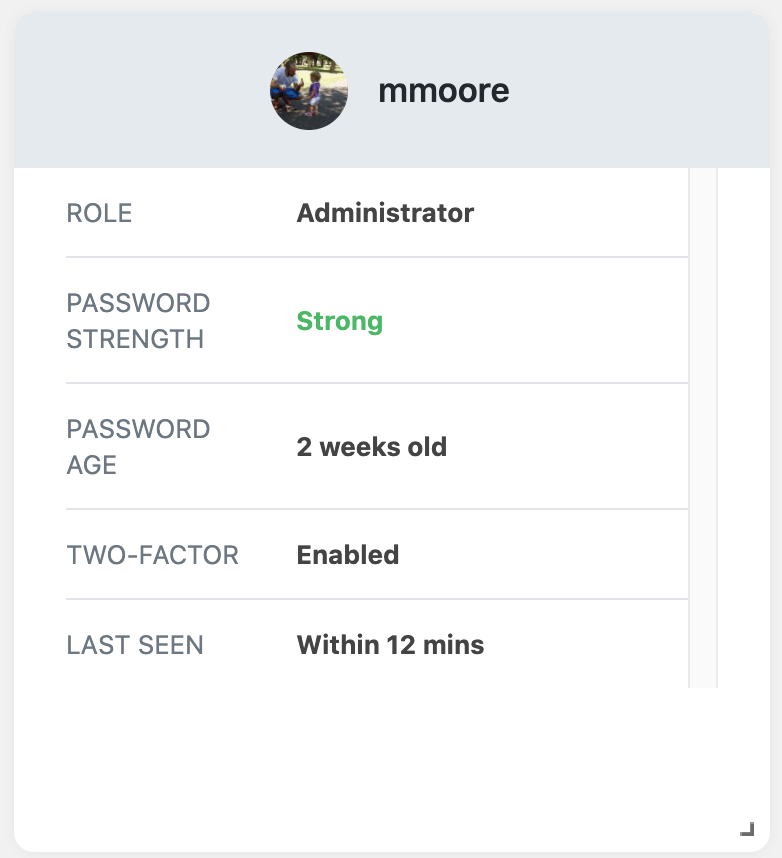
Pin a single user’s profile to your dashboard, and see their user role, password strength and age, whether or not they have two-factor enabled and when they were last on the site.
4. Active Lockouts

Display all active lockouts. If your client locked themselves out, you can quickly clear the lockout from this card.
5. Lockout

See a history of lockouts on our site.
6. Banned Users

View a history if IPs banned by iThemes Security.
7. Brute Force Attacks

Displays a graph that charts brute force activity.
8. Trusted Devices
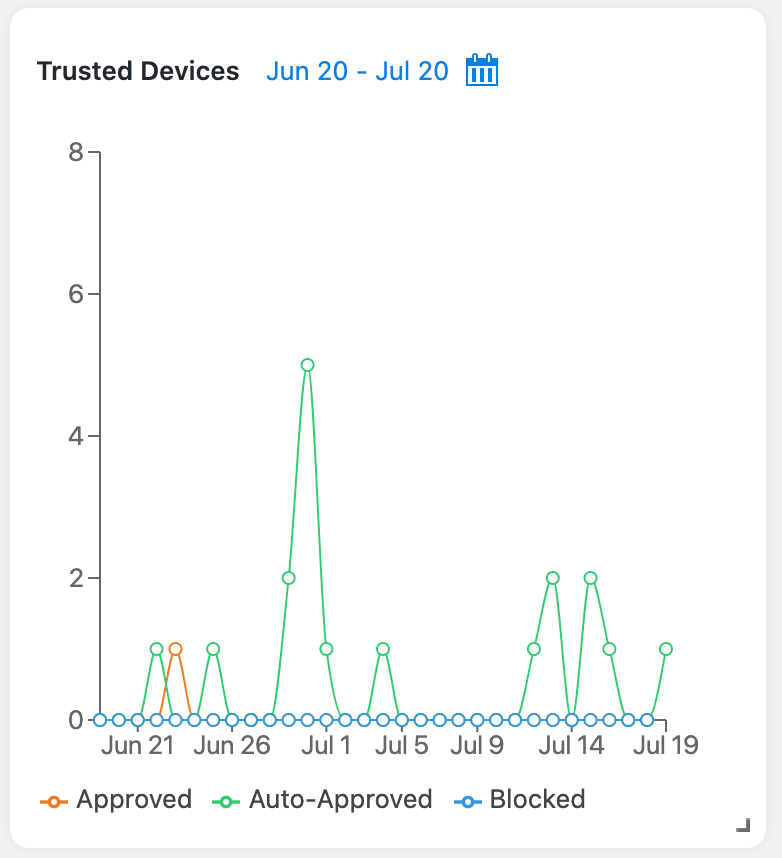
Displays a graph charting approved, auto approved and blocked devices.
9. 404s

See an overview of 404s over the past 30 days.
10. Database Backups
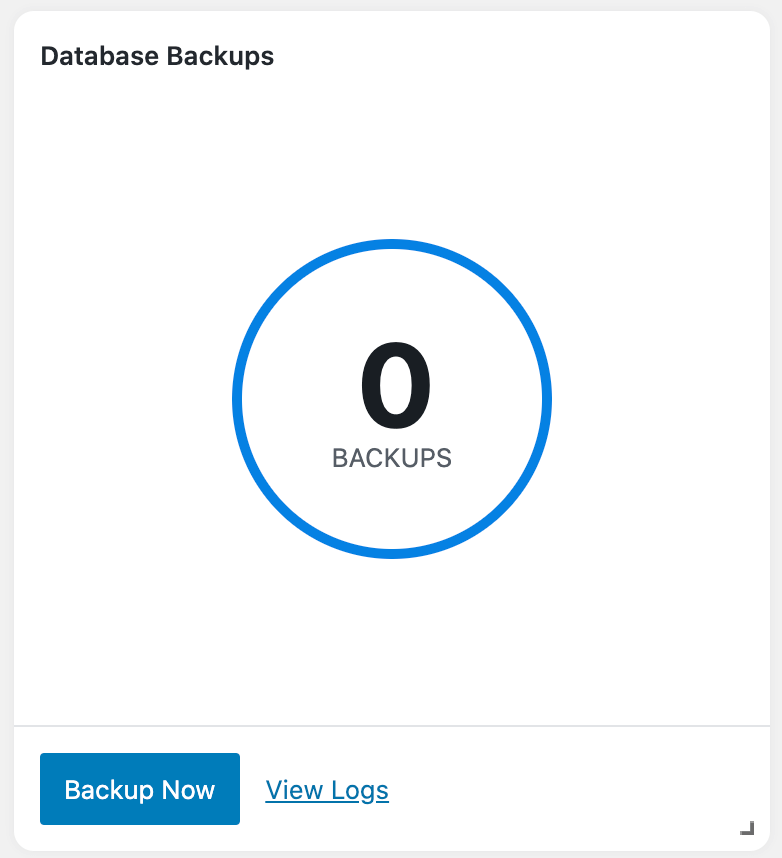
View a 30-day history of backups and create a new database backup.
11. Update Summary
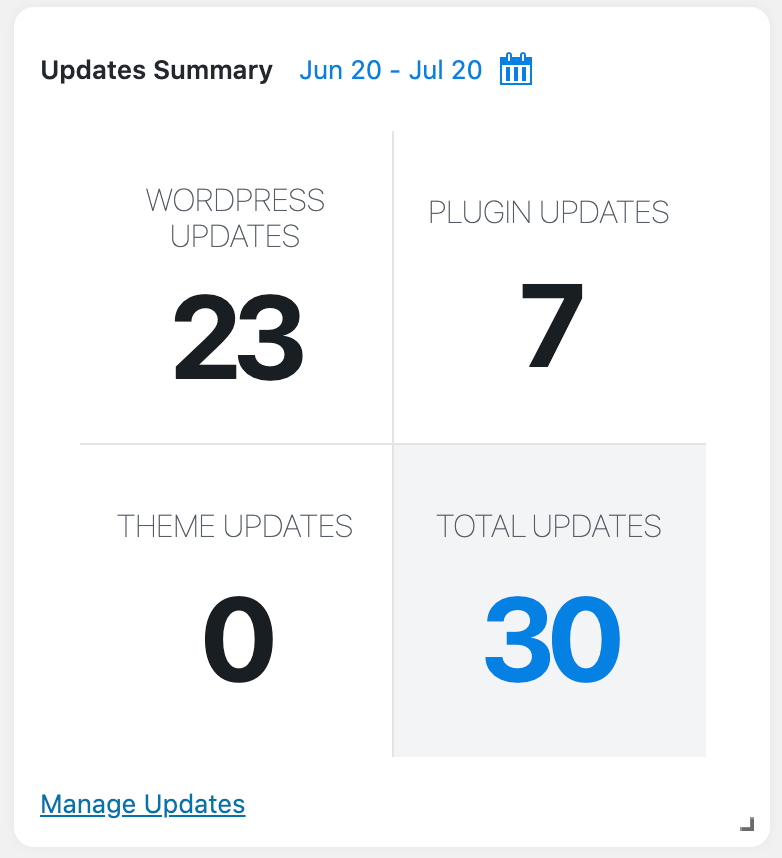
Display the number of WordPress, plugin, and theme updates over a specific time.
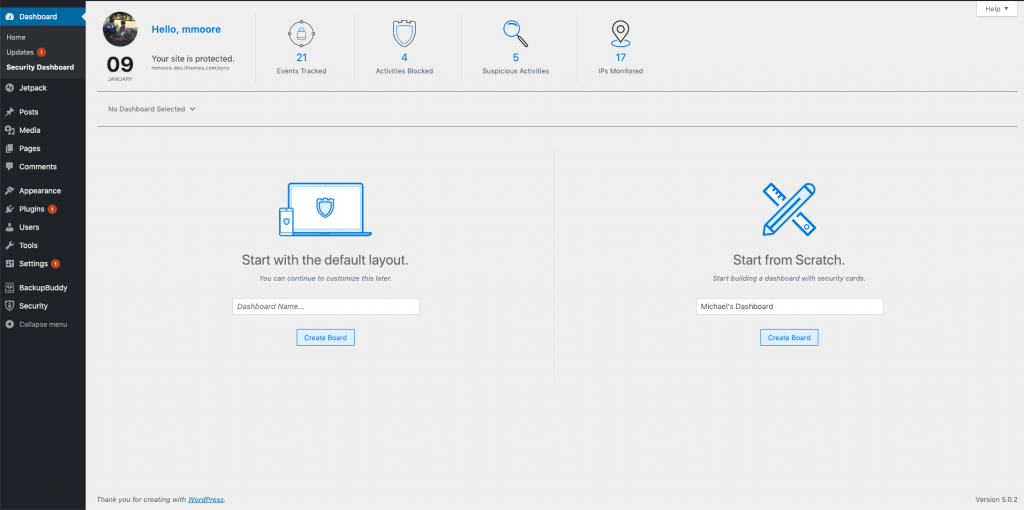
How to Create a Security Dashboard in iThemes Security Pro
To start using the Security Dashboard, make sure it is enabled on the main page of the security settings.

Once enabled, you can create your first security dashboard from both the Admin Dashboard menu and Security settings in your WordPress Admin menu.

Next, you can create a new dashboard using the iThemes Security default dashboard or create one from scratch. Enter a name for your board and then click the Create Board button.
The goal of the Security Dashboard is to give you the information you want in a way that makes sense to you. You can start with a blank canvas and add only the cards that are important to you.

The dynamic security dashboard is entirely customizable. You pick the cards you want to see, the order they appear on your screen, and how big or small you want each card to be. This is your dashboard created by you for you.
6. Up Your Password Game with Password Requirements
Passwords are your first line of defense from attacks on your WordPress login. The Password Requirement feature in iThemes Security Pro is not only your password policy, but it is also your enforcement tool.

You can force members of a user group to use a strong password, choose a time of password expiration, refuse compromised passwords, and force a site-wide passwords change to make everyone comply with your new strong password policy.
- Force Strong Passwords – Force a set of users to use a strong password.
- Password Expiration – Set the maximum number of days a password can be used before it is expired.
- Refuse Compromised Passwords – Force users to use passwords that have not appeared in any password breaches tracked by Have I Been Pwned.
- Force Password Change – Force all users to change their password upon their next login.
7. Fine Tune Your Security Notification Emails
The Notification Center has all of the tools you need to manage the email notifications generated by iThemes Security Pro.
The Notification Center module is located on the main page of the security settings. Click the Configure Settings button to start customizing your email notifications.

The first two things you want to set up in the Notification Center are the From Email and the Default Recipients list.

The From Email is the email address iThemes Security Pro will use to send notifications. The Default Recipients is the list of people that will receive email notification unless otherwise specified.
You can also customize the recipients for each email notification sent from iThemes Security Pro. Let’s say that the only email notification that you want a client to see is the Security Digest. To do this, scroll down to the Security Digest email settings and click the Recipient toggle, and select Custom.

Check the box next to your client’s username to add them to the Security Digest email list.

The Subject, and Message can be customized for most of the emails in the Notification Center. You can take advantage of the different email tags to personalize the emails. For example, you can use the username tag to include the recipients username in the email.

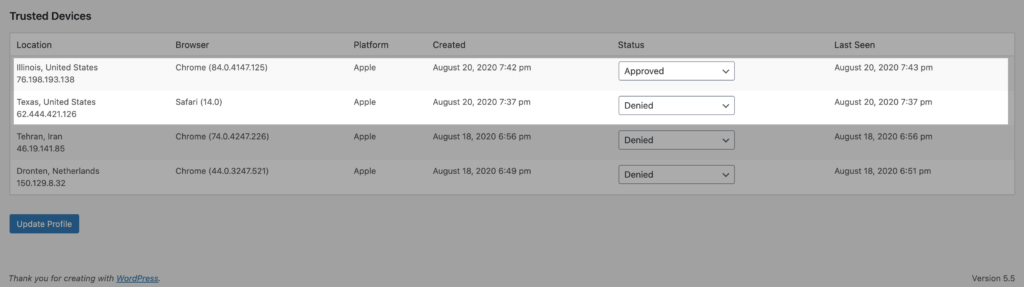
8. Protect your WP Dashboard with Trusted Devices
The iThemes Security Pro Trusted Devices feature limits access to the WordPress dashboard to a list of approved devices.
Once you let iThemes Security Pro know which devices are yours, Trusted Devices can protect your site in 2 different ways:
1. Restrict the Capabilities of Unrecognized Devices – When someone logs in using an unrecognized device, you can restrict their administrator-level capabilities and prevent them from editing their login details. iThemes Security Pro will then send an email to the address set in their WordPress user profile.
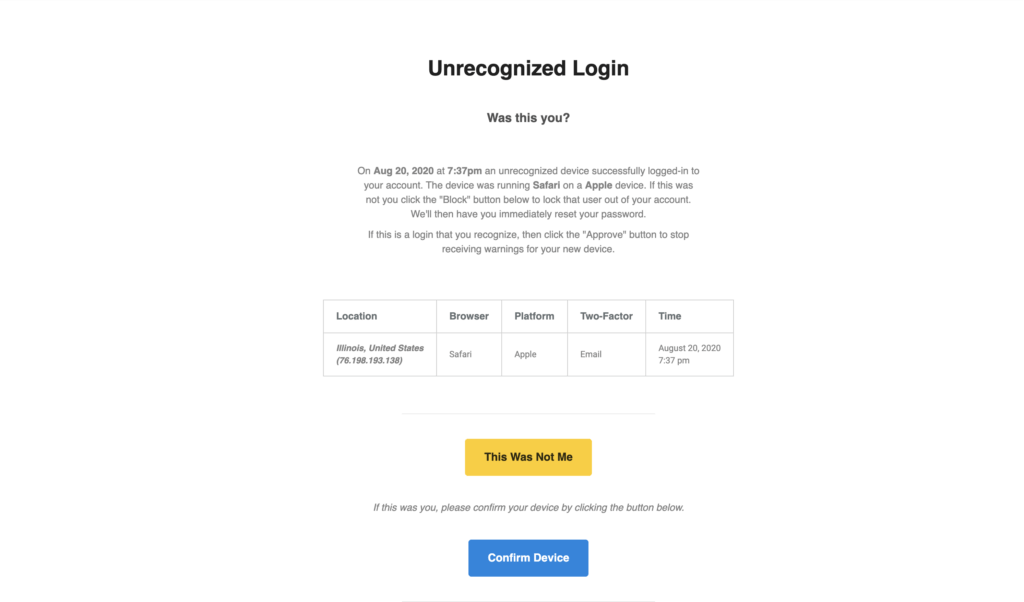
The unrecognized login email will have the option to either confirm or block the device. If the Confirm Device button is clicked, the user will have their admin capabilities restored. If the This Was Not Me button is clicked, iThemes Security Pro will log out the illegitimate user, and the device the denied device list in the WordPress profile.
2. Session Hijacking Protection – Session hijacking is an attack where a user session is taken over by an attacker. For example, WordPress generates a session cookie every time you log into your website. And let’s say you have a browser extension with a vulnerability that allows hackers to hijack your browser cookie. After hijacking your session, the hacker will be able to start making malicious changes to your website.
If a user’s device changes during a session, iThemes Security will automatically log the user out to prevent any unauthorized activity on the user’s account, such as changing the user’s email address or uploading malicious plugins.
9. Utilize User Groups to Manage User Security
The Users Groups module in iThemes Security Pro allows you to quickly see which settings that affect the user experience are enabled and make modifications to them from a single location.

To make it easier to manage the user security on your site, iThemes Security Pro sorts all of your users into different groups. By default, your users will be grouped by their WordPress capabilities. Sorting by WordPress capabilities allows for easy combining of WordPress and custom user roles into the same group. For example, if you are running a WooCommerce site, your site Administrators and Shop Managers will be in the Admin User Group, and your Subscribers and Customers will be in the Subscriber User Group.
In the User Groups settings, you will see all your user groups and all of the security settings that are enabled for each group, and quickly toggle the settings on and off. User Group gives you the confidence you are applying the right level of security to the right users.
10. Create a Universal Support User
The most underutilized feature in iThemes Security Pro is Privilege Escalation. The feature allows you to temporarily escalate the privileges of a user.
Anytime you create a new user, especially an Admin user, you are adding another entry point that a hacker could exploit. But, there are times you may need some outside help for your website, like when you are seeking support.
You can create a new user and name it Support and give it the Subscriber user role. The next time you need to provide temporary access to your website, navigate to your Support user’s Profile page.
Update the email address to allow the outside support person to request a new password. Then scroll down until you see the Temporary Privilege Escalation settings. Click the Set Temporary Role toggle, and select Admin. The user will now have Admin access for the next 24 hours.
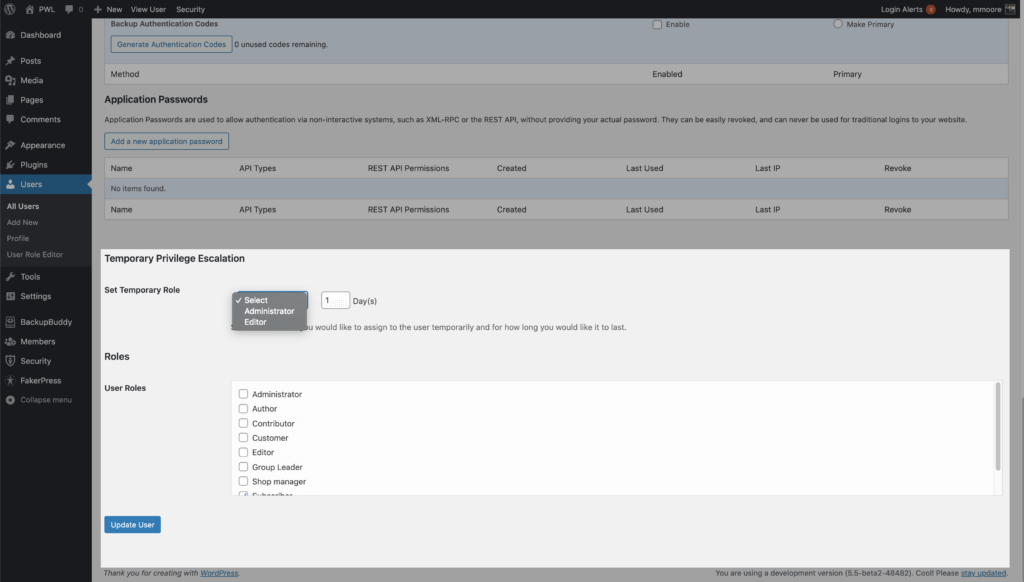
If they don’t need the full 24 hours, you can revoke the privilege escalation from the user profile page.
Wrapping Up
iThemes Security Pro has a ton of different tools you can use to secure and protect your website. Here is a checklist to help you get started securing your WordPress website after installing iThemes Security Pro.
- 1. Run the Security Check
- 2. Enable Automatic Vulnerability Patching
- 3. Block Bad Bots with Google reCAPTCHA v3
- 4. Lockdown Your WP User With a 2FA App
- 5. Create a Security Dashboard
- 6. Up Your Password Game
- 7. Fine Tune Your Security Emails
- 8. Protect your WP Dashboard with Trusted Devices
- 9. Get Familiar with User Groups
- 10. Create a Universal Support User
The post The Top 10 Things To Do After Installing iThemes Security Pro appeared first on iThemes.
Source: Security Feed